

How Do I Start Texting from my Salesforce™ Org?

You will need to perform the following steps in order to enable texting in your Salesforce™ org:
Download and install the application from the AppExchange and install it in your Salesforce™ org
Run the Setup Wizards (account & compliance) and create your paid account
Add the Chat Panel to Page Layout(s)
Enable the Utility Bar Text Manager (optional but recommended)
Purchase a phone number
Create a campaign
Associate your campaign to your purchased phone number
1 - Download and Install the App
Download the app from the AppExchange and install it in your Salesforce™ org. We recommend install it for all users.
Note: If you do not want certain users to have access to the app, you can install for specific users OR you can control visibility via component visibility settings or by Organization-Wide Defaults (OWD’s) and/or custom or manual sharing rules (discussed in Visibility Settings).
Note: The user installing the package is given a permission set “Text Anything Admin” which allows he or she to see the admin panel. This permission set will need to be added to any other users that require access to the Text Anything admin panel.

2 - Run the Setup Wizard and Create Your Account
Once you’ve installed the application, go to the Text Anything app in the app menu. The first time the Text Anything app loads you will be greeted with a wizard that walks you through registration and account setup.

3 - Adding The Chat Panel to a Page Layout
To text from your Salesforce™ org you will need to add the Text Anything Chat Panel (which is a Salesforce™ Lightning Web Component) to a page layout on an object which you intend to send text messages to. For example, the most common use case is to put the Chat Panel on the Contact layout and select “mobile” phone as the default number for which to send text messages to. Instructions to add the component are as follows:
On a record layout page, in the top right corner click the gear icon and “edit page”. In this example we are using a contact record but this works for any standard or custom object. Note: The standard or custom object must have at least one phone number field.

4 - Enable the Utility Bar Text Manager
The utility bar Text Manager works similarly to text messages on your phone. It shows up to 100 of your last conversations on the utility bar which stays open as you navigate from page to page.
The Utility Bar Text Manager has the following features:
Toggle between “read” and “unread” messages
Messages are shown with the newest messages at the top
Up to 100 conversations are shown but it can be configured to show less in the Admin Panel
With Administrator rights, from the Home tab in Setup, enter “App Manager” in the Quick Find box, then select App Manager.
To edit or add a utility bar to an existing app, click Edit in the dropdown menu next to your app.
To create a Lightning app with a utility bar, click New Lightning App.
Click the Utility Items tab and add the Text Anything Utility Bar Manager.
You can specify component and utility properties, like the height and width of the utility panel, however we recommend you keep the default values.

5 - Purchase a Phone Number
In the Text Anything app, go to the “Purchased Numbers” tab. From here you can search for and purchase ten digit long codes. This includes regular 10DLC and toll free numbers. You also have the ability to find local numbers or numbers for anywhere you do business.

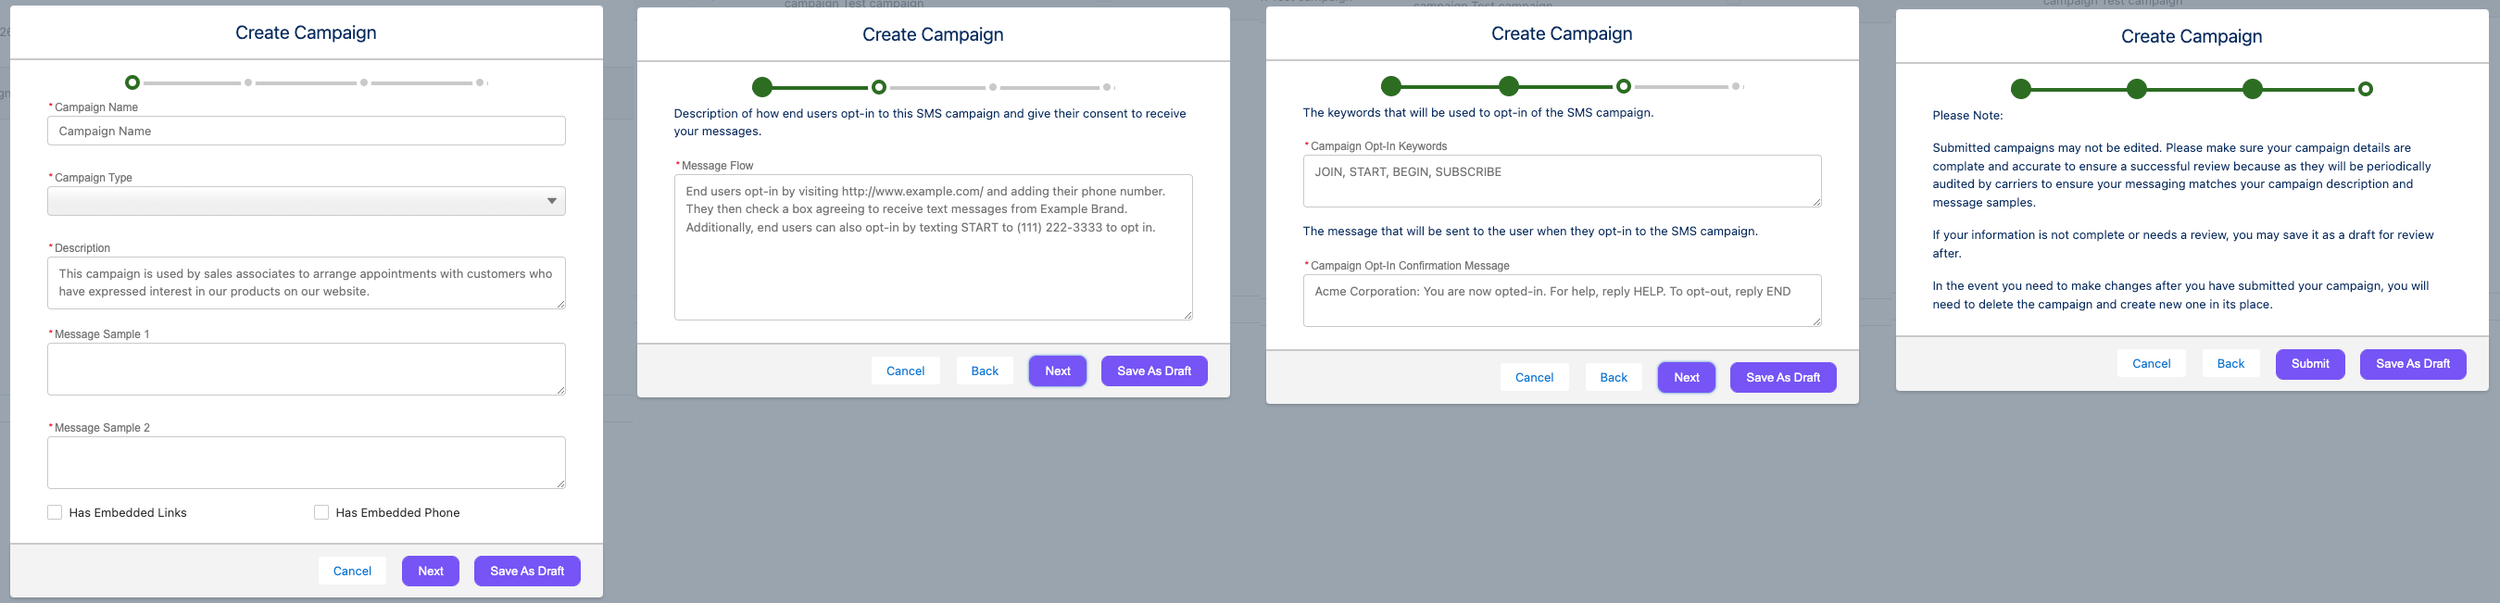
6 - Create a Campaign
First, before you can submit a campaign you should verify your account status is ACTIVE and your A2P 10DLC status is APPROVED. This is done in the “A2P & Campaign(s) tab. Upon completing registration it can take up to 48 hours (although most complete within an hour). Note: You can save campaigns as drafts while waiting for account approval.

To create a campaign, in the “A2P & Campaign(s)” tab, select the subtab “Messaging Campaign(s)” and follow the steps in the wizard.
Name your campaign
Select a campaign type that fits the type of messaging you will be using the campaign for, i.e., customer care
Write a description
Include two message samples that are indicative of the messages your users will send per the campaign type
Describe your “message flow” - how users opt-in, i.e., “Users check a box on a web form granting [our company] consent to send them text messages…”
Select custom opt-in keywords, i.e., “JOIN”. This is relevant if you campaign requires double opt-in (text XXX-XXX-XXXX to receive text messages)
Enter your custom opt-in message - this is what the customer will receive on a double opt-in campaign as confirmation.
Submit your campaign
Notes:
Web forms are single opt-in and do not require double opt-in confirmation
Double opt-in is a way of confirming that your contacts want to join a text messaging list. It is preferred but not mandatory.
Opt-out keywords are not customizable and by default are: STOP, STOPALL, UNSUBSCRIBE, CANCEL, END, or QUIT
Help keywords are not customizable and by default are: HELP and INFO
Your campaigns will periodically be audited by carriers to ensure that your messages are in line with your message samples and campaign type so we encourage you to be as accurate as possible and keep your messaging within the bounds of the campaign type - i.e., “customer care”.
7 - Map Your Purchased Phone Number to Your Campaign
Lastly, in the same subtab, click the “Messaging Campaign Mapping” button. This allows you to create your approved campaigns with the numbers you purchased.

You are now ready to start texting customers. If you have more than one campaign, the first time a user texts a customer he/she will be asked to select the appropriate campaign to use via a dropdown menu in the chat box header.
